If you want to test the HBase Indexer with a higher throughput than the manual puts explained in the Tutorial, but don’t want to bother setting up your own schema & application, you will find the demo ingester tools useful.
The most basic indexer configuration only requires a table name and a single field. However, there are many configuration settings that can be used in an indexer configuration file to customize behavior.
The following is a list of attributes that can be set on the top-level element in an indexer configuration.
以下列出的属性可以在顶层<indexer>节点中配置。
table
The table attribute specifies the name of the HBase table to be indexed by the indexer. It is the only mandatory attribute in the indexer element.
table属性用于指定HBase需要索引器索引的表名。这个indexer节点中强制要求的属性。
mapping-type
The mapping-type attribute has two possible values: row, or column. This attribute specifies whether row-based or column-based indexing is to be performed.
Row-based indexing treats all data within a single HBase row as input for a single document in Solr. This is the kind of indexing that would be used for an HBase table that contains a separate entity in each row, e.g. a table containing users.
Column-based indexing treats each HBase cell as input for a single document in Solr. This approach could be used for example in a messaging platform where a single user’s messages are all stored in a single row, with each message being stored in a separate cell.
The read-row attribute has two possible values: dynamic, or never.
read-row属性有两种值:dyamic和never。
This attribute is only important when using row-based indexing. It specifies whether or not the indexer should re-read data from HBase in order to perform indexing.
这个属性中对基于行索引的方式才是重要的。它指定索引器为了进行索引是否需要从Hbase重新读取数据。
When set to “dynamic”, the indexer will read the necessary data from a row if a partial update to the row is performed in HBase. In dynamic mode, the row will not be re-read if all data needed to perform indexing is included in the row update.
If this attribute is set to never, a row will never be re-read by the indexer.
如果这个属性被设置为never,索引器不会重读行数据。
The default setting is “dynamic”.
默认的设置是“dynamic”。
mapper
The mapper attribute allows the user to specify a custom mapper class that will create a Solr document from a HBase Result object. The mapper class must implement the com.ngdata.hbaseindexer.parse.ResultToSolrMapper interface.
The unique-key-formatter attribute specifies the name of the class used to format HBase row keys (as well as column families and column qualifiers) as text. A textual representation of these pieces of information is needed for indexing in Solr, as all data in Solr is textual, but row keys, column families, and column qualifiers are byte arrays.
The default value of this attribute is com.ngdata.hbaseindexer.uniquekey.StringUniqueKeyFormatter. The StringUniqueKey formatter simply treats row keys and other byte arrays as strings.
If your row keys, column families, or qualifiers can’t simply be used as strings, consider using the com.ngdata.hbaseindexer.uniquekey.HexUniqueKeyFormatter.
This attribute specifies the name of the document identifier field used in Solr.
这个属性指定Solr中文档的标识字段。
The default value for this field is “id”.
默认值是“id”。
row-field
The row-field attribute specifies the name of the Solr field to be used for storing an HBase row key.
row-field属性指定了Solr中用于存储Hbase rowkey的安段名。
This field is only important when doing column-based indexing. In order for the indexer to be able to delete all documents for a single row from the index, it needs to be able to find all documents for the row in Solr. When this attribute is populated in the indexer definition, it’s value is used as the name of a field in Solr to store the encoded row key.
By default, this attribute is empty, meaning that the row key is not stored in Solr. The consequence of this is that deleting a complete row or complete column family in HBase will not delete the indexed documents in Solr.
The column-family-field specifies the name of the Solr field to be used for storing the HBase column family name.
column-family-field指定Solr中用于存储HBase列簇名的字段名。
See the description of the row-field attribute for more information.
查看row-field属性查看更多的信息。
By default, this attribute is empty, so the column-family name is not saved in Solr.
默认情况,这个属性为空,也就是说,列簇不会被Solr存储。
table-name-field
The table-name-field specifies the name of the Solr field to be used for storing the name of the HBase table where a record is stored.
table-name-field指定Solr中用于存储Hbase表名的字段名。
By default, this attribute is empty, so the name of the HBase table is not stored unless this setting is explicitly set in the indexer config.
默认情况,这个属性是空,也就是说Hbase的表名不会被存储除非在indexer节点中明确指定。
indxer内定义的节点(Elements within the indexer definition)
There are three types of elements that can be used within an indexer configuration: , , and .
在indexer节点有三种类型的节点:, 和
The field element defines a single field to be indexed in Solr, as well as where its contents are to be taken from and interpreted from HBase. There are typically one or more fields listed in an indexer configuration – one for each Solr field to be stored.
The value attribute specifies the data to be used from HBase for populating the field in Solr. It takes the form of a column family name and qualifier, separated by a colon.
value属性指定了Hase用于填充Solr字段的数据。它采用列族名和限定符的形式,用冒号分隔。
The qualifier portion can end in an asterisk, which is interpreted as a wildcard. In this case, all matching column-family and qualifier expressions will be used.
The following are examples of valid value attributes:
以下是有效值属性的示例:
mycolumnfamily:myqualifier
mycolumnfamily:my*
mycolumnfamily:*
source
The source attribute determines what portion of an HBase KeyValue will be used as indexing content.
Source属性确定HBASE KeyValue的哪个部分将用作索引内容。
It has two possible values: value and qualifier.、
它有两个可能的值:value和qualifier。
When value is specified (which is the case by default), then the cell value is used as input for indexing.
当指定值时(默认情况下是这种情况),则使用单元格值作为索引的输入。
When qualifier is specified, then the column qualifier is used as input for indexing.
当指定限定符时,列限定符将用作索引的输入。
type
The type attribute defines the datatype of the content in HBase.
type属性定义HBASE中内容的数据类型。
Because all data is stored in HBase as byte arrays, but all content in Solr is indexed as text, a method for converting from byte arrays to the actual datatype is needed.
The value of this field can be one of any of the datatypes supported by the HBase Bytes class: int, long, string, boolean, float, double, short, or bigdecimal.
If the Bytes-based representation has not been used for storing data in HBase, the name of a custom class can be specified for this attribute. The custom class must implement the com.ngdata.hbaseindexer.parse.ByteArrayValueMapper interface.
<!-- Do row-based indexing on table "table1", never re-reading updated content. Store the unique document id in Solr field called "custom-id". Additionally store the row key in a Solr field called "custom-row", and store the column family in a Solr field called "custom-family". Perform conversion of byte array keys using the class "com.mycompany.MyKeyFormatter". --> <indexer table="table1" mapping-type="row" read-row="never" unique-key-field="custom-id" row-field="custom-row" column-family-field="custom-family" table-name-field="custom-table" unique-key-formatter="com.mycompany.MyKeyFormatter" >
<!-- A float-based field taken from any qualifier in the column family "colfam" --> <fieldname="field1"value="colfam:*"source="qualifier"type="float"/> <paramname="globalKeyA"value="globalValueA"/> <paramname="globalKeyB"value="globalValueB"/>
This page explains how to start doing basic indexing in HBase. Before following this tutorial, make sure that the HBase Indexer and other required software is installed and running as explained in the installation instructions.
At this point, HBase and Solr (in cloud mode) should be running, and the HBase Indexer should be unpacked in a directory (which we’ll call $INDEXER_HOME). For this tutorial, it is assumed that the default example index schema is being used by Solr (as explained on the installation page).
In the HBase shell, create a table. For this tutorial, we’ll create a table named “indexdemo-user”, with a single column family named “info”. Note that the REPLICATION_SCOPE of the column family of the table must be set to 1.
Note that the above command assumes that ZooKeeper is running on localhost on port 2181, and that there is a Solr Core called “collection1” configured. If you are doing this tutorial on an existing HBase/Solr environment, you may need to use different settings.
In the HBase shell, try adding some data to the indexdemo-user table 在Hbase shell中,尝试给indexdemo-user添加一些数据。
1 2
hbase> put 'indexdemo-user', 'row1', 'info:firstname', 'John' hbase> put 'indexdemo-user', 'row1', 'info:lastname', 'Smith'
After adding this data, take a look in Solr (i.e. http://localhost:8983/solr/#/collection1/query). You should see a single document in Solr that has the firstname_s field set to “John”, and the lastname_s field set to “Smith”.
Note If you don’t have autoCommit enabled in Solr, you won’t be able to see the updated contents immediately in Solr. The demo environment has autoCommit enabled for a commit every second.
Next, unpackage the tar.gz distribution (in the example below it is unpacked under your $HOME directory).
接下来,解压tar.gz发布包(这个例子中,他被解压到$HOME目录)。
1 2
tar zxvf hbase-indexer-dist/target/hbase-indexer-1.0-SNAPSHOT.tar.gz -C ~ cd ~/hbase-indexer-1.0-SNAPSHOT
配置Hbase Indexer(Configure HBase Indexer)
In the hbase-indexer directory, edit the file conf/hbase-indexer-site.xml and configure the ZooKeeper connection string (twice, once for hbase-indexer, and once for hbase, alternatively you can copy your hbase-site.xmlto the conf directory).
If you have not defined JAVA_HOME globally, and the bin/hbase-indexer script would complain it doesn’t find you Java, you can set the JAVA_HOME in the script conf/hbase-indexer-env.sh.
In order to use the HBase Indexer, replication must be enabled in HBase. There are also a number of other HBase settings that can be set to optimize the working of the HBase indexer.
<configuration> <!-- SEP is basically replication, so enable it --> <property> <name>hbase.replication</name> <value>true</value> </property> <!-- Source ratio of 100% makes sure that each SEP consumer is actually used (otherwise, some can sit idle, especially with small clusters) --> <property> <name>replication.source.ratio</name> <value>1.0</value> </property> <!-- Maximum number of hlog entries to replicate in one go. If this is large, and a consumer takes a while to process the events, the HBase rpc call will time out. --> <property> <name>replication.source.nb.capacity</name> <value>1000</value> </property> <!-- A custom replication source that fixes a few things and adds some functionality (doesn't interfere with normal replication usage). --> <property> <name>replication.replicationsource.implementation</name> <value>com.ngdata.sep.impl.SepReplicationSource</value> </property> </configuration>
添加Indexer jar到HBase(Add indexer jars to HBase)
The HBase Indexer includes two jar files that need to be in the classpath of HBase. Copy these from the lib directory of the unpacked hbase-indexer installation into the lib directory of HBase for each region server.
Ensure that Solr is running. In general, it’s easiest to have Solr use the same ZooKeeper instance as HBase.
确保Solr已经运行。通常,很容易让Hbase和Solr共用相同的ZooKeeper。
Assuming that you’ve downloaded Solr 4.2.0 and you’re running ZooKeeper on the current machine, you can start up the base Solr in cloud mode using the example schema as follows:
Use the following command to build the binary distribution (.tar.gz & rpm):
使用如下命令构建生成二进制发布包(.tar.gz & rpm):
1
mvn -DskipTests -Pdist install
测试(Testing)
These steps assume a running HBase 0.94.x installation (preferably CDH 4.2), as well as a running Solr installation. For this example, the configured Solr schema will need to have a multi-valued field called “data”, as well as a unique key field called “id”.
Unzip the binary distribution (instructions for creating the binary distribution are listed above).
解压发布包(生成发布包的方式已经在上文列出)。
1
$ tar zxvf hbase_indexer.tar.gz
Copy the hbase-sep jar files from the lib directory of the binary distribution into the lib directory of HBase.
将发布包下的lib目录的hbase-sep jar文件拷贝到Hbase的lib目录。
1 2
$ cd hbase_indexer $ sudo cp lib/hbase-sep-* /usr/lib/hbase/lib
Create a table in HBase that has replication enabled. For this example, we’ll create a table called “record” with a single column family called ‘data’.
Create an indexer definition. For this example, we’ll just index anything in the data column family into the “data” field in Solr. Save the below contents in a file called ‘sample.xml’.
Add the indexer definition to the indexer server. The following command assumes that the Solr ZooKeeper is running on the current host, and the name of the collection to be used for indexing is “core0”.
The following software is required for running the HBase Indexer:
运行Hbase Indexer需要下面的这些软件:
HBase 0.94.x
Solr 4.x in cloud mode
ZooKeeper 3.x (required by the two above packages)
All components can be run on a single machine, or they can be run on multiple machines on a cluster.
所有的组件可以运行在单机,也可运行在多台机器的集群上。
详情(Details)
HBase
HBase 0.94.x is the supported version of HBase for the HBase Indexer. It is recommended to use the version of HBase 0.94.2 that is bundled with Cloudera CDH 4.2. However, other versions of HBase 0.94.x may also work. CDH 4.2 is currently used for testing.
HBase should be configured to use HDFS as its filesystem – HBase Indexer is not fully functional if the local filesystem implementation is used instead of HDFS.
The HBase Indexer project provides indexing (via Solr) for content stored in HBase. It provides a flexible and extensible way of defining indexing rules, and is designed to scale.
Indexing is performed asynchronously, so it does not impact write throughput on HBase. SolrCloud is used for storing the actual index in order to ensure scalability of the indexing.
开始使用Hbase Indexer(Getting started with the HBase Indexer)
Make sure you’ve got the required software installed, as detailed on the Requirements page.
Follow the Tutorial to get a feel for how to use the HBase Indexer.
Customize your indexing setup as needed using the other reference documentation provided here.
确认所有要求的软件已经安装,具体内容在[要求]页。
按照教程来体验下如何使用Hbase Indexer。
通过提供的文档来调整索引的配置。
工作原理(How it works)
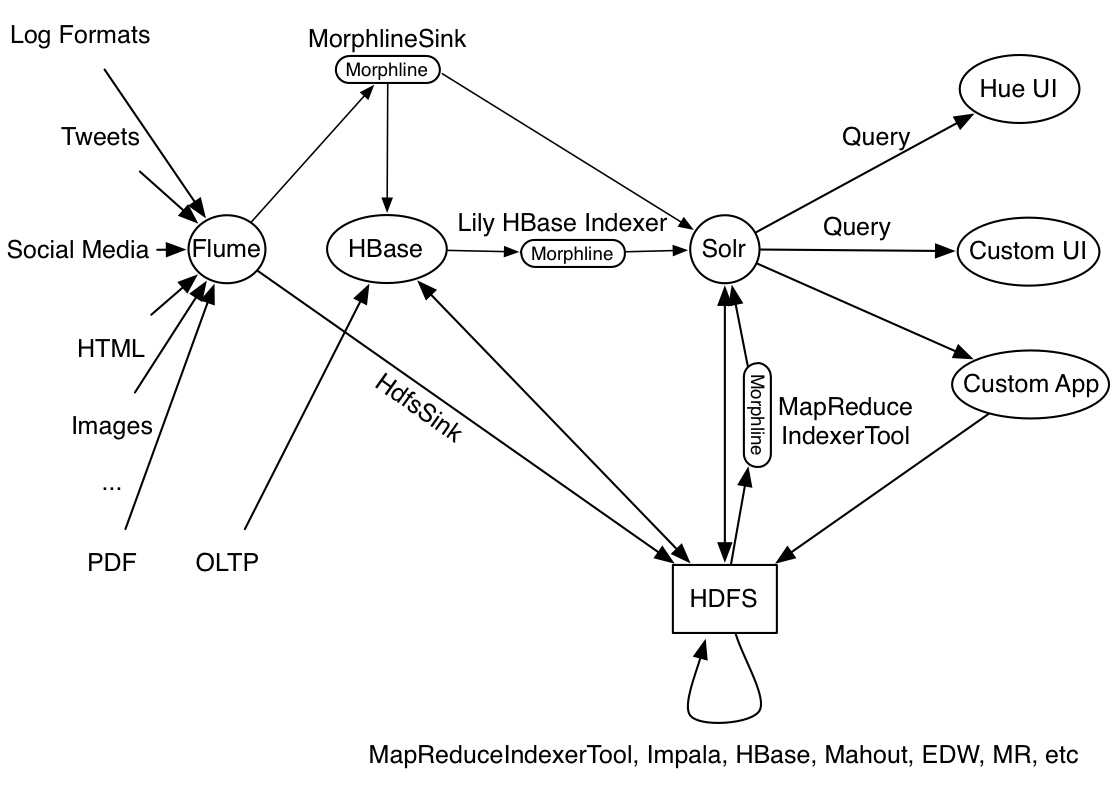
The HBase Indexer works by acting as an HBase replication sink. As updates are written to HBase region servers, they are “replicated” asynchronously to the HBase Indexer processes.
The indexed documents in Solr contain enough information to uniquely identify the HBase row that they are based on, allowing you to use Solr to search for content that is stored in HBase.
HBase replication is based on reading the HBase log files, which are the precise source of truth of the what is stored in HBase: there are no missing or no extra events. In various cases, the log also contains all the information needed to index, so that no expensive random-read on HBase is necessary (see the read-rowattribute in the Indexer Configuration).
HBase replication delivers (small) batches of events. HBase-indexer exploits this by avoiding double-indexing of the same row if it would have been updated twice in a short time frame, and as well will batch/buffer the updates towards Solr, which gives important performance gains. The updates are applied to Solr before confirming the processing of the events to HBase, so that no event loss is possible.
All information about indexers is stored in ZooKeeper. New indexer hosts can always be added to a cluster, in the same way that HBase regionservers can be added to to an HBase cluster.
All indexing work for a single configured indexer is shared over all machines in the cluster. In this way, adding additional indexer nodes allows horizontal scaling.
同一索引配置的所有索引工作被分配给集群中的所有机器。这样说来,添加额外的索引节点就可以横向扩展。
自动的错误处理(Automatic failure handling)
The HBase replication system upon which the HBase Indexer is based is designed to handle hardware failures. Because the HBase Indexer is based on this system, it also benefits from the same ability to handle failures.
Go is often described as a concurrent-friendly language. The reason for this is that it provides a simple syntax over two powerful mechanisms: goroutines and channels.
A goroutine is similar to a thread, but it is scheduled by Go, not the OS. Code that runs in a goroutine can run concurrently with other code. Let’s look at an example:
funcmain() { fmt.Println("start") go process() time.Sleep(time.Millisecond * 10) // this is bad, don't do this! 这样不好,不能这么做! fmt.Println("done") }
funcprocess() { fmt.Println("processing") }
There are a few interesting things going on here, but the most important is how we start a goroutine. We simply use the go keyword followed by the function we want to execute. If we just want to run a bit of code, such as the above, we can use an anonymous function. Do note that anonymous functions aren’t only used with goroutines, however.
Goroutines are easy to create and have little overhead. Multiple goroutines will end up running on the same underlying OS thread. This is often called an M:N threading model because we have M application threads (goroutines) running on N OS threads. The result is that a goroutine has a fraction of overhead (a few KB) than OS threads. On modern hardware, it’s possible to have millions of goroutines.
Furthermore, the complexity of mapping and scheduling is hidden. We just say this code should run concurrently and let Go worry about making it happen.
此外,因为隐藏了映射和调度的复杂性。我们只需要说这段代码需要并发执行,然后让Go自己来运行它。
If we go back to our example, you’ll notice that we had to Sleep for a few milliseconds. That’s because the main process exits before the goroutine gets a chance to execute (the process doesn’t wait until all goroutines are finished before exiting). To solve this, we need to coordinate our code.
Creating goroutines is trivial, and they are so cheap that we can start many; however, concurrent code needs to be coordinated. To help with this problem, Go provides channels. Before we look at channels, I think it’s important to understand a little bit about the basics of concurrent programming.
Writing concurrent code requires that you pay specific attention to where and how you read and write values. In some ways, it’s like programming without a garbage collector – it requires that you think about your data from a new angle, always watchful for possible danger. Consider:
funcmain() { for i := 0; i < 2; i++ { go incr() } time.Sleep(time.Millisecond * 10) }
funcincr() { counter++ fmt.Println(counter) }
What do you think the output will be?
你觉得输出的会是什么呢?
If you think the output is 1, 2 you’re both right and wrong. It’s true that if you run the above code, you’ll very likely get that output. However, the reality is that the behavior is undefined. Why? Because we potentially have multiple (two in this case) goroutines writing to the same variable, counter, at the same time. Or, just as bad, one goroutine would be reading counter while another writes to it.
Is that really a danger? Yes, absolutely. counter++ might seem like a simple line of code, but it actually gets broken down into multiple assembly statements – the exact nature is dependent on the platform that you’re running. It’s true that, in this example, the most likely case is things will run just fine. However, another possible outcome would be that they both see counter when its equal to 0 and you get an output of 1, 1. There are worse possibilities, such as system crashes or accessing an arbitrary piece of data and incrementing it!
The only concurrent thing you can safely do to a variable is to read from it. You can have as many readers as you want, but writes need to be synchronized. There are various ways to do this, including using some truly atomic operations that rely on special CPU instructions. However, the most common approach is to use a mutex:
A mutex serializes access to the code under lock. The reason we simply define our lock as lock sync.Mutex is because the default value of a sync.Mutex is unlocked.
Seems simple enough? The example above is deceptive. There’s a whole class of serious bugs that can arise when doing concurrent programming. First of all, it isn’t always so obvious what code needs to be protected. While it might be tempting to use coarse locks (locks that cover a large amount of code), that undermines the very reason we’re doing concurrent programming in the first place. We generally want fine locks; else, we end up with a ten-lane highway that suddenly turns into a one-lane road.
The other problem has to do with deadlocks. With a single lock, this isn’t a problem, but if you’re using two or more locks around the same code, it’s dangerously easy to have situations where goroutineA holds lockA but needs access to lockB, while goroutineB holds lockB but needs access to lockA.
It actually is possible to deadlock with a single lock, if we forget to release it. This isn’t as dangerous as a multi-lock deadlock (because those are really tough to spot), but just so you can see what happens, try running:
There’s more to concurrent programming than what we’ve seen so far. For one thing, there’s another common mutex called a read-write mutex. This exposes two locking functions: one to lock for reading and one to lock for writing. This distinction allows multiple simultaneous readers while ensuring that writing is exclusive. In Go, sync.RWMutex is such a lock. In addition to the Lock and Unlock methods of a sync.Mutex, it also exposes RLock and RUnlock methods; where R stands for Read. While read-write mutexes are commonly used, they place an additional burden on developers: we must now pay attention to not only when we’re accessing data, but also how.
Furthermore, part of concurrent programming isn’t so much about serializing access across the narrowest possible piece of code; it’s also about coordinating multiple goroutines. For example, sleeping for 10 milliseconds isn’t a particularly elegant solution. What if a goroutine takes more than 10 milliseconds? What if it takes less and we’re just wasting cycles? Also, what if instead of just waiting for goroutines to finish, we want to tell one hey, I have new data for you to process!?
These are all things that are doable without channels. Certainly for simpler cases, I believe you should use primitives such as sync.Mutex and sync.RWMutex, but as we’ll see in the next section, channels aim at making concurrent programming cleaner and less error-prone.
The challenge with concurrent programming stems from sharing data. If your goroutines share no data, you needn’t worry about synchronizing them. That isn’t an option for all systems, however. In fact, many systems are built with the exact opposite goal in mind: to share data across multiple requests. An in-memory cache or a database, are good examples of this. This is becoming an increasingly common reality.
Channels help make concurrent programming saner by taking shared data out of the picture. A channel is a communication pipe between goroutines which is used to pass data. In other words, a goroutine that has data can pass it to another goroutine via a channel. The result is that, at any point in time, only one goroutine has access to the data.
A channel, like everything else, has a type. This is the type of data that we’ll be passing through our channel. For example, to create a channel which can be used to pass an integer around, we’d do:
The type of this channel is chan int. Therefore, to pass this channel to a function, our signature looks like:
这个通道的类型是chan int。因此,将这个通道传递给一个函数是,可以这样声明:
1
funcworker(c chanint) { ... }
Channels support two operations: receiving and sending. We send to a channel by doing:
通道支持2种操作:接收和发送。我们可以使用下面方式往通道发送数据:
1
CHANNEL <- DATA
and receive from one by doing
然后可以使用下面方式从通道接收数据:
1
VAR := <-CHANNEL
The arrow points in the direction that data flows. When sending, the data flows into the channel. When receiving, the data flows out of the channel.
箭头的方向就是数据的流动方向。当发送数据时,数据流入通道。当发送数据时,数据是流出通道。
The final thing to know before we look at our first example is that receiving and sending to and from a channel is blocking. That is, when we receive from a channel, execution of the goroutine won’t continue until data is available. Similarly, when we send to a channel, execution won’t continue until the data is received.
Consider a system with incoming data that we want to handle in separate goroutines. This is a common requirement. If we did our data-intensive processing on the goroutine which accepts the incoming data, we’d risk timing out clients. First, we’ll write our worker. This could be a simple function, but I’ll make it part of a structure since we haven’t seen goroutines used like this before:
func(w Worker)process(c chanint) { for { data := <-c fmt.Printf("worker %d got %d\n", w.id, data) } }
Our worker is simple. It waits until data is available then “processes” it. Dutifully, it does this in a loop, forever waiting for more data to process.
funcmain() { c := make(chanint) for i := 0; i < 5; i++ { worker := &Worker{id: i} go worker.process(c) }
for { c <- rand.Int() time.Sleep(time.Millisecond * 50) } }
type Worker struct { id int }
func(w *Worker)process(c chanint) { for { data := <-c fmt.Printf("worker %d got %d\n", w.id, data) } }
We don’t know which worker is going to get what data. What we do know, what Go guarantees, is that the data we send to a channel will only be received by a single receiver.
Notice that the only shared state is the channel, which we can safely receive from and send to concurrently. Channels provide all of the synchronization code we need and also ensure that, at any given time, only one goroutine has access to a specific piece of data.
Given the above code, what happens if we have more data coming in than we can handle? You can simulate this by changing the worker to sleep after it has received data:
for { data := <-c fmt.Printf("worker %d got %d\n", w.id, data) time.Sleep(time.Millisecond * 500) }
What’s happening is that our main code, the one that accepts the user’s incoming data (which we just simulated with a random number generator) is blocking as it sends to the channel because no receiver is available.
In cases where you need high guarantees that the data is being processed, you probably will want to start blocking the client. In other cases, you might be willing to loosen those guarantees. There are a few popular strategies to do this. The first is to buffer the data. If no worker is available, we want to temporarily store the data in some sort of queue. Channels have this buffering capability built-in. When we created our channel with make, we can give our channel a length:
You can make this change, but you’ll notice that the processing is still choppy. Buffered channels don’t add more capacity; they merely provide a queue for pending work and a good way to deal with a sudden spike. In our example, we’re continuously pushing more data than our workers can handle.
Nevertheless, we can get a sense that the buffered channel is, in fact, buffering by looking at the channel’s len:
尽管如此,事实上,我们可以查看通道的len,来了解到带缓存的通道的缓冲情况:
1 2 3 4 5
for { c <- rand.Int() fmt.Println(len(c)) time.Sleep(time.Millisecond * 50) }
You can see that it grows and grows until it fills up, at which point sending to our channel start to block again.
你可以看到它的长度在不断增大,直到装满为止,此时,往通道发送的数据又开始被阻塞。
选择(Select)
Even with buffering, there comes a point where we need to start dropping messages. We can’t use up an infinite amount of memory hoping a worker frees up. For this, we use Go’s select.
Syntactically, select looks a bit like a switch. With it, we can provide code for when the channel isn’t available to send to. First, let’s remove our channel’s buffering so that we can clearly see how select works:
for { select { case c <- rand.Int(): //optional code here default: //this can be left empty to silently drop the data fmt.Println("dropped") } time.Sleep(time.Millisecond * 50) }
We’re pushing out 20 messages per second, but our workers can only handle 10 per second; thus, half the messages get dropped.
我们每秒往通道中发送20个信息,但是我们的处理器每秒只能处理10个信息;因此,有一半的信息被丢弃。
This is only the start of what we can accomplish with select. A main purpose of select is to manage multiple channels. Given multiple channels, select will block until the first one becomes available. If no channel is available, default is executed if one is provided. A channel is randomly picked when multiple are available.
It’s hard to come up with a simple example that demonstrates this behavior as it’s a fairly advanced feature. The next section might help illustrate this though.
很难想出一个简单的例子来证明这种行为,因为这是一种高级特性。在下一小节可能有助于说明这个问题。
超时(Timeout)
We’ve looked at buffering messages as well as simply dropping them. Another popular option is to timeout. We’re willing to block for some time, but not forever. This is also something easy to achieve in Go. Admittedly, the syntax might be hard to follow but it’s such a neat and useful feature that I couldn’t leave it out.
To block for a maximum amount of time, we can use the time.After function. Let’s look at it then try to peek beyond the magic. To use this, our sender becomes:
for { select { case c <- rand.Int(): case <-time.After(time.Millisecond * 100): fmt.Println("timed out") } time.Sleep(time.Millisecond * 50) }
time.After returns a channel, so we can select from it. The channel is written to after the specified time expires. That’s it. There’s nothing more magical than that. If you’re curious, here’s what an implementation of after could look like:
funcafter(d time.Duration)chanbool { c := make(chanbool) gofunc() { time.Sleep(d) c <- true }() return c }
Back to our select, there are a couple of things to play with. First, what happens if you add the default case back? Can you guess? Try it. If you aren’t sure what’s going on, remember that default fires immediately if no channel is available.
Also, time.After is a channel of type chan time.Time. In the above example, we simply discard the value that was sent to the channel. If you want though, you can receive it:
case t := <-time.After(time.Millisecond * 100): fmt.Println("timed out at", t)
Pay close attention to our select. Notice that we’re sending to c but receiving from time.After. select works the same regardless of whether we’re receiving from, sending to, or any combination of channels:
If multiple channels are available, one is randomly picked.
If no channel is available, the default case is executed.
If there’s no default, select blocks.
第一个可用的通道被选择。
如果有多个通道可用,随机选择一个。
如果没有通道可用,默认条件被执行。
如果没有默认条件,选择阻塞。
Finally, it’s common to see a select inside a for. Consider:
最后,select通常在for循环中使用。例如:
1 2 3 4 5 6 7 8 9
for {
  select {
  case data := <-c:
    fmt.Printf("worker %d got %d\n", w.id, data)
  case <-time.After(time.Millisecond * 10):
    fmt.Println("Break time")
    time.Sleep(time.Second)
  }
}
继续之前(Before You Continue)
If you’re new to the world of concurrent programming, it might all seem rather overwhelming. It categorically demands considerably more attention and care. Go aims to make it easier.
Goroutines effectively abstract what’s needed to run concurrent code. Channels help eliminate some serious bugs that can happen when data is shared by eliminating the sharing of data. This doesn’t just eliminate bugs, but it changes how one approaches concurrent programming. You start to think about concurrency with respect to message passing, rather than dangerous areas of code.
Having said that, I still make extensive use of the various synchronization primitives found in the sync and sync/atomic packages. I think it’s important to be comfortable with both. I encourage you to first focus on channels, but when you see a simple example that needs a short-lived lock, consider using a mutex or read-write mutex.
I recently heard Go described as a boring language. Boring because it’s easy to learn, easy to write and, most importantly, easy to read. Perhaps, I did this reality a disservice. We did spend three chapters talking about types and how to declare variables after all.
If you have a background in a statically typed language, much of what we saw was probably, at best, a refresher. That Go makes pointers visible and that slices are thin wrappers around arrays probably isn’t overwhelming to seasoned Java or C# developers.
If you’ve mostly been making use of dynamic languages, you might feel a little different. It is a fair bit to learn. Not least of which is the various syntax around declaration and initialization. Despite being a fan of Go, I find that for all the progress towards simplicity, there’s something less than simple about it. Still, it comes down to some basic rules (like you can only declare variable once and := does declare the variable) and fundamental understanding (like new(X) or &X{} only allocate memory, but slices, maps and channels require more initialization and thus, make).
Beyond this, Go gives us a simple but effective way to organize our code. Interfaces, return-based error handling, defer for resource management and a simple way to achieve composition.
Last but not least is the built-in support for concurrency. There’s little to say about goroutines other than they’re effective and simple (simple to use anyway). It’s a good abstraction. Channels are more complicated. I always think it’s important to understand basics before using high-level wrappers. I do think learning about concurrent programming without channels is useful. Still, channels are implemented in a way that, to me, doesn’t feel quite like a simple abstraction. They are almost their own fundamental building block. I say this because they change how you write and think about concurrent programming. Given how hard concurrent programming can be, that is definitely a good thing.